pie beta kappa

this blog is for the servantless but professional overachiever who is concerned with assignments, deadlines, and changing the world, and still wants to find the time to enjoy producing something wonderful to eat.

Category: dessert

happy birthday julia

JULIA CHILD would be 100 today. I know, this isn’t the only food blog pointing out this out. But come on, people. Just because something is this celebrated doesn’t mean that it’s not cool to cover it. It would be like a law blog failing to cover Sandra Day O’Connor’s 100th birthday. How could you?

My generation wasn’t revolutionized by Julia Child’s work. By the time we came of cooking age, the (first) world believed that gourmet cooking was accessible to everyone. Cookbooks abound, food has multiple channels devoted to its craft full-time, and food blogs are popping up everywhere. Cooking is a friendly, social, approachable activity. And so, before Julie Powell and Hollywood and the media reminded us of her importance and her impact, we didn’t fully know what we owed her.  But, perhaps, the best legacy a person can leave is to so transform a field that those who come after don’t realize how far it has come, because the changes you make become normal and the revolution becomes invisible.

Confession time. I grew up watching a lot of cooking shows with my mother. Julia Child’s “The French Chef” was one of them; however, my single-digit self favored “The Frugal Gourmet.” (Why? I have no idea. The six-year-old heart wants what the six-year-old heart wants.) She was so far off my radar that, while I like everyone else picked up a copy of “Mastering the Art of French Cooking” when “Julie & Julia” came out, I didn’t actually cook anything from it. Until this week, I had never cooked a single Julia Child recipe.

Not only that, but I had never baked a cake.

So yes, this post is a doozie.  First Julia Child recipe, first cake.  I chose the butter spongecake (biscuit au berre) complete with buttercream frosting (creme au berre).  And, while I didn’t drop the cake on the floor or make some other drastic yet comical mistake a la the great Julia Child, I learned a very important lesson.

You may be thinking, wow that frosting looks easy.  Its recipe involves only four ingredients and one short paragraph of description: what could go wrong? Soft creamy buttercream frosting, my friend, becomes a solid very, very easily. And then you are left with creamy-looking buttercream frosting that is frozen in place: beautiful and untouchable until it warms back up.  A word of warning: when cooling buttercream frosting, keep a very close eye on it.

Beyond that, the butter spongecake and the buttercream frosting was delicious.  Very simple tasting in a good way, replete with lots of butter (as all good desserts should be).  M. isn’t big on desserts, but he ate this right up.  The cake can also be served with just a dusting of sifted powdered sugar, but I recommend the buttercream frosting.  Unfrozen, that is.

Happy birthday, Julia, and bon appetit.

maple banana pecan bread

TO CALL IT BREAD feels like cheating, somehow.  Sure, it has that quintessential loaf “shape.”  They contain those essential building blocks of baking: flour, sugar, salt, eggs, butter.  But banana bread is so thick, so moist, so sweet.  So fundamentally different from crusty baguettes and rounded sourdough and whorled rye.

And yet.  When I tried some standard banana bread recipes, it just didn’t quite hit the spot.  First I made a loaf of the Cook’s Illustrated The Best Banana Bread.  Then I took the recipe for Ina Garten’s Banana Crunch Muffins and poured two thirds of the recipe into a loaf pan and baked it for a lot longer than the muffins would have required.  And then I decided that, while the former may be the best banana bread I’ve ever eaten, I wanted something more.

My inspiration was butter pecan ice cream.  And the thing is, I didn’t even eat the ice cream recently for it to inspire me.  Its siren song was that strong.  And so I substituted toasted pecans for the walnuts, topped it with whole pecans, and coated the whole thing with a layer of maple syrup for added sweetness.  And it was better than the best banana bread.  It was maple banana pecan bread.

And then it was gone.

MAPLE BANANA PECAN BREAD, adapted from Cook’s Illustrated’s Best Banana Bread

Ingredients
2 cups all-purpose flour
3/4 cup sugar
3/4 teaspoon baking soda
1/2 teaspoon salt
1 1/4 cups toasted pecans, all but 8-10 coarsely chopped
3 large, very ripe bananas, mashed
1/4 cup plain yogurt
2 large eggs, beaten slightly
6 tablespoons butter, melted and cooled
1 teaspoon vanilla extract
1/4-1/2 cup pure maple syrup

Directions
Preheat oven to 350 degrees after adjusting rack to middle of oven.

Butter bottom and sides of 9″x5″ loaf pan and set aside.

Combine flour, sugar, baking soda, salt, and chopped pecans in large bowl, mix until combined and pecans are coated.

Mix mashed bananas, yogurt, eggs, butter, and vanilla in a medium bowl with a wooden spoon.  Lightly fold banana mixture into dry mixture until just combined.  Batter will look thick and chunky.

Scrape batter into prepared loaf pan.  Place remaining whole pecans on top of batter.  Drizzle maple syrup across top of batter until thinly coated.

Bake until loaf is golden brown and a toothpick inserted into the center comes out clean, approximately 55 minutes depending on the temperament of your oven.  Cool in pan for a few minutes, then remove and cool on cooling rack.

Serve warm if possible.

the slump

IT’S BEEN ONE OF THOSE WEEKS.  The ones where nothing goes right in the kitchen.  The pan was too hot for the eggs I scrambled on Saturday (my simple-weekend-staple with goat cheese that never, never fails), my well-honed melon-divining skills failed me on Sunday, and I even messed up the rice in Monday’s dinner.  Rice!  As Jo March would say, I couldn’t boil water without burning it.  (Very close to it, actually — the water and jasmine rice boiled, then burned.)

I like to think that Ina Garten and Bobby Flay have those days, too.  The ones where the vegetables burn while the chicken remains undercooked, where the jam won’t set to save its life, where the butter that you’re trying to help soften just a little bit suddenly becomes very yellow, very melted butter.  I would like to think that Julia Child had a cooking slump once in her life.

I suppose this is a roundabout apology for no real new post this week.  I finally gave up, and as the temperatures rose and my cooking slump worsened, I finally succumbed and went off the grid.  I put away the camera, took out a spoon and  four ingredients and the ice cream maker M. and I got as a wedding gift and made undocumented, no pressure peach ice cream.  The recipe was in the Food Network Magazine’s editor’s note, and combines 14 oz. condensed milk, 8-9 peeled, pitted and sliced peaches, 1 cup of sugar, and 36 ounces of peach soda to create a an almost-sorbet-like, almost-fizzy, very peachy ice cream.  (In case you’re wondering, puree the first three ingredients until the peaches are in very small pieces, mix in the soda, and let the ice cream maker do the rest.)  It was quick and simple and delicious, the perfect thing for a warm July evening and, hopefully, the perfect solution to a cooking slump.

But even if it didn’t solve my slump… I have ice cream.

pie 2: live free or pie hard

SEQUEL TIME.  Because this is the sequel to the seminal pie post, it needed a funny, punny movie sequel play on words.  “Life Free or Pie Hard” was the winner for its true ridiculousness.  “Pie Another Day” was a close second.  Runner-ups included “Pie-r Pie-r”, “Pie Story 2”, “Harry Potter and the Half-Baked Pie”, and “P2: The Pie-ty Ducks.”  Any better suggestions are, of course, absolutely welcome.

And some credit where credit is due: almost all of the photos on this blog are taken by a very patient M. who deals with questions like “What’s the best lighting for rhubarb?” like a pro.  (And the answer to that question: there is none.)

GRANDMOTHER’S HERSHEY BAR PIE, from the kitchen of my grandmother

Ingredients
1/2 cup milk (whole is best)
24 large marshmallows
6 1/2 ounce Hershey with Almond bars, shaved
1 pint whipping cream
1 9″ baked pie shell
1 extra Hershey with Almonds bar for garnish

Directions
Heat milk over a double boiler or in a glass bowl over simmering water.  Do not boil.  Add marshmallows and stir until thoroughly melted.  Add shaved chocolate bars and stir until thoroughly melted.

Cool thoroughly.

Whip 1/2 pint whipping cream and fold into the cooled chocolate mixture.

Pour into pie shell and refrigerate at least two hours.

Whip remaining cream and spread over the filling or pipe through a pastry bag with a rose tip.  Top with chocolate curls from the extra Hershey bar, if it’s managed to survive.

Notes

This is a very sweet pie, so you need to be in the mood for marshmallows and chocolate.  (I know, I know.  That sounds ludicrous.  Who isn’t in the mood for marshmallows and chocolate?  But it suffered when eaten in contrast to fruit-laden pies.)

If shaving the chocolate is too time-consuming or if you come dangerously close to shaving your finger instead of the chocolate (*ahem*), an alternative is to cut the chocolate in very slender strips with a good chef’s knife or santoku knife.  It melts just the same, but might not be as pretty for garnish.

And speaking of the garnish… a word to the wise.  It is very, very dangerous, when mixing marshmallows and chocolate, to leave the chocolate pieces that you are saving for the top on the kitchen counter.  Not only can they disappear into the mouths of bystanders (piestanders?) before you can say “stop!”, but they are also awfully, awfully tempting to the piemaker.  I would recommend buying a little extra and setting the extra in plain view while hiding the rest.

STRAWBERRY-RHUBARB PIE, straight from Cook’s Illustrated

Ingredients
1 pie dough (for both top and bottom)
2 teaspoons vegetable oil
1.5 pounds rhubarb, ends trimmed, cut into 3/4-inch pieces (peel if tough)
1 cup and 1 tablespoon sugar
1 pound strawberries, hulled and quartered
3 tablespoons arrowroot powder
1/2 teaspoon vanilla
2 teaspoons orange zest
1 egg white, beaten
pinch of salt

Directions
Confession time.  This is the first recipe that wasn’t altered at all.  We followed it to the letter except for one thing that was a decision based on necessity rather than artistry (ran out of arrowroot, substituted one tablespoon of corn starch for one tablespoon of the three tablespoons of arrowroot).  And because of that, I am going to recommend going to the source for the recipe.  If you’re not a member of CooksIllustrated.com, you can join for free for 14 days to get the recipe (and believe me, this recipe was worth it).

Notes

Absolutely amazing recipe.  Cooks Illustrated, and Nick, the co-pie-lot in the kitchen for pie day (oh, come on, there had to be one more pie pun before this was over), hit this out of the park.

this american pie

PIE IS supposed to be the quintessential American dish.  “As American as apple pie” is perhaps one of the earliest similes learned by schoolchildren.  But the truth of the matter is that the history of pie is neither an American one or a sweet one.  While pies, and sweet pies in particular, have gained a rather devoted following in the last few centuries, Laura Mayer in TIME briefly explored the history of pie just in time for Thanksgiving 2008 and noted that the vast majority of pie’s existence has been spent as a savory meat pie.  In fact, Mayer credits the Greeks with inventing pastry (insofar as a butterless flour-water combination can be called “pastry”) and, therefore, inventing pie.  Personally, I think we humans are secretive creatures who like to get our hands dirty, so the inclination to (1) squish gooey dough in our hands and then (2) hide something inside of it is contained deep within our souls.

So what does one put inside of one’s dough?  Almost anything.  Pie can act as a kind of preserving apparatus, in a way.  Meat, fruit, vegetables… anyone who has eaten shepherd’s pie has probably thought, “where do they come up with this stuff?” right before asking for seconds.  But, on a more personal level, what do you choose for the first pie you ever make?

Probably not a huge soul-searching dilemma.  Unless you have a food blog.  Whose name has pie in it.  And you’ve managed to spend a not-insignificant portion of adult life puttering around the kitchen and studiously avoiding pie.  Then, there’s a little bit of soul-searching.  Vacillating.  Pontificating.  Ruminating.  Procrastinating.  Until finally, finally, you have it.

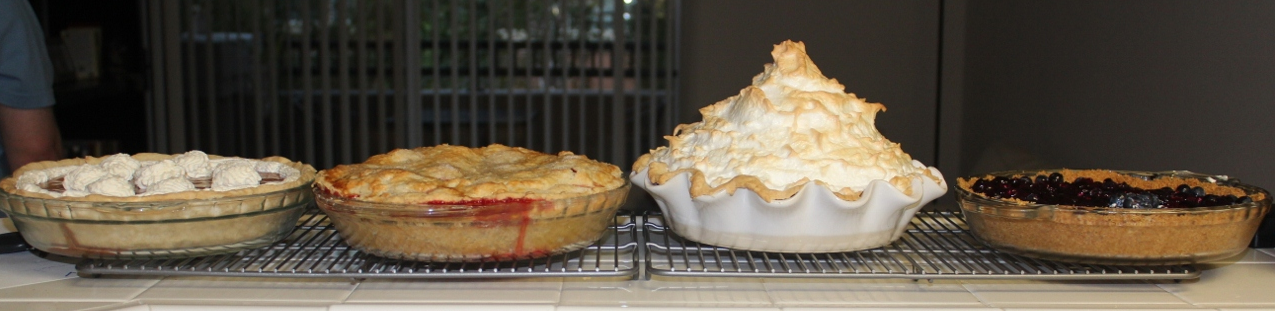
And so you call up a few friends, and make four pies instead.

This is the first of two pie installments servings.  Each has a simple and simply delicious pie passed down from my mother’s mother, and a pie from Those Who Get Paid to Make Pie Well.

The very first pie to find itself chilling in the refrigerator (you heard me, I started with a no-bake pie) was my grandmother’s fresh berry pie.  Now, when my grandmother made it, it was always boysenberries, fresh from the small garden in their backyard.  My grandfather loved boysenberries.  This could be any berry you want, but in the spirit of making pies to delight the heart of one’s beloved, I made a blueberry pie.

GRANDMOTHER’S FRESH BERRY PIE, from my grandmother’s kitchen
makes one 9″ pie

Ingredients
Graham Cracker Crust
1 1/4 cups graham cracker crumbs
1/4 cup sugar
5 tablespoons unsalted butter (melted)
1/8 teaspoon salt

Filling
4 cups fresh berries, divided
1 cup sugar
3 tablespoons cornstarch
3/4 cup water
1 teaspoon lemon juice
Directions
Mix the graham cracker crumbs, 1/4 cup sugar, unsalted butter, and salt.
Using the back of a wooden spoon and/or the bottom of a small glass, press the crumb mixture firmly on the bottom and up the sides of the pie plate.
Line the graham cracker crust with three cups of the berries.
Simmer the remaining berries with water for 3-4 minutes.  Add sugar and cornstarch, stir and cook until clear.  Add lemon juice to the mixture and stir.

Cool, then pour over berries and refrigerate.  Serve with real whipped cream.
watch out for wayward dollops of cream when baking four pies at once
Notes
If you’re using a berry that doesn’t automatically fail the “I dropped it on my white shirt” test, like a blueberry, the pie could use more of the simmered blueberry mixture on top of the blueberries.  It might also help with some cohesion issues I found myself having.  (I blame the blueberries.)
 
MILE HIGH LEMON MERINGUE PIE, adapted from Martha Stewart
Ingredients
All purpose flour, for dusting
Pie pastry dough, blind baked (I used the one in this post, instead of Martha’s pate brisee base, mostly because the French intimidated me and I was already sufficiently intimidated by the meringue.  And because I liked the dough I’d made)
Lemon Filling
1 large egg
2 tablespoons heavy cream
1/3 cup cornstarch
1/3 cup sifted cake flour
1/4 teaspoon salt
1 1/4 cups sugar
5 large egg yolks, lightly beaten
1/2 cup fresh lemon juice
2 tablespoons lemon rind
4 tablespoons unsalted butter, cut into small pieces
Meringue
7 large egg whites
3/4 cup sugar
1/4 teaspoon salt
Directions
Bake the pastry shell according to directions and allow to cool.
For the lemon filling, combine cornstarch, cake flour, salt, and sugar in a medium saucepan over medium heat.  Martha notes that this should be a nonreactive saucepan.  I only had one kind, and it turns out it was nonreactive.  Copper saucepans are, apparently, reactive.  Don’t use copper saucepans in this recipe.
 
Gradually add two cups of cold water and bring the mixture to a boil, whisking constantly.  This should take about four minutes.
Remove the nonreactive saucepan from the heat.  Pour a small amount of the hot mixture into the egg yolks to temper them and keep the lemon filling from becoming lemon-and-scrambled-egg filling, then add the eggs to the nonreactive saucepan.  Cook over low heat for five minutes.
Remove the pan from the heat again and whisk in the lemon juice and rind.  Add the butter one piece at a time, but in a fairly methodical manner while the mixture is warm enough to melt the butter.
 
When the butter is fully melted and absorbed into the mixture, pour it into a large bowl and let it cool.  Place wax paper directly on top of the  surface to prevent a skin from forming.
When cool, pour the filling into the pastry shell, cover with aluminum foil, and refrigerate for approximately one hour, until firm.
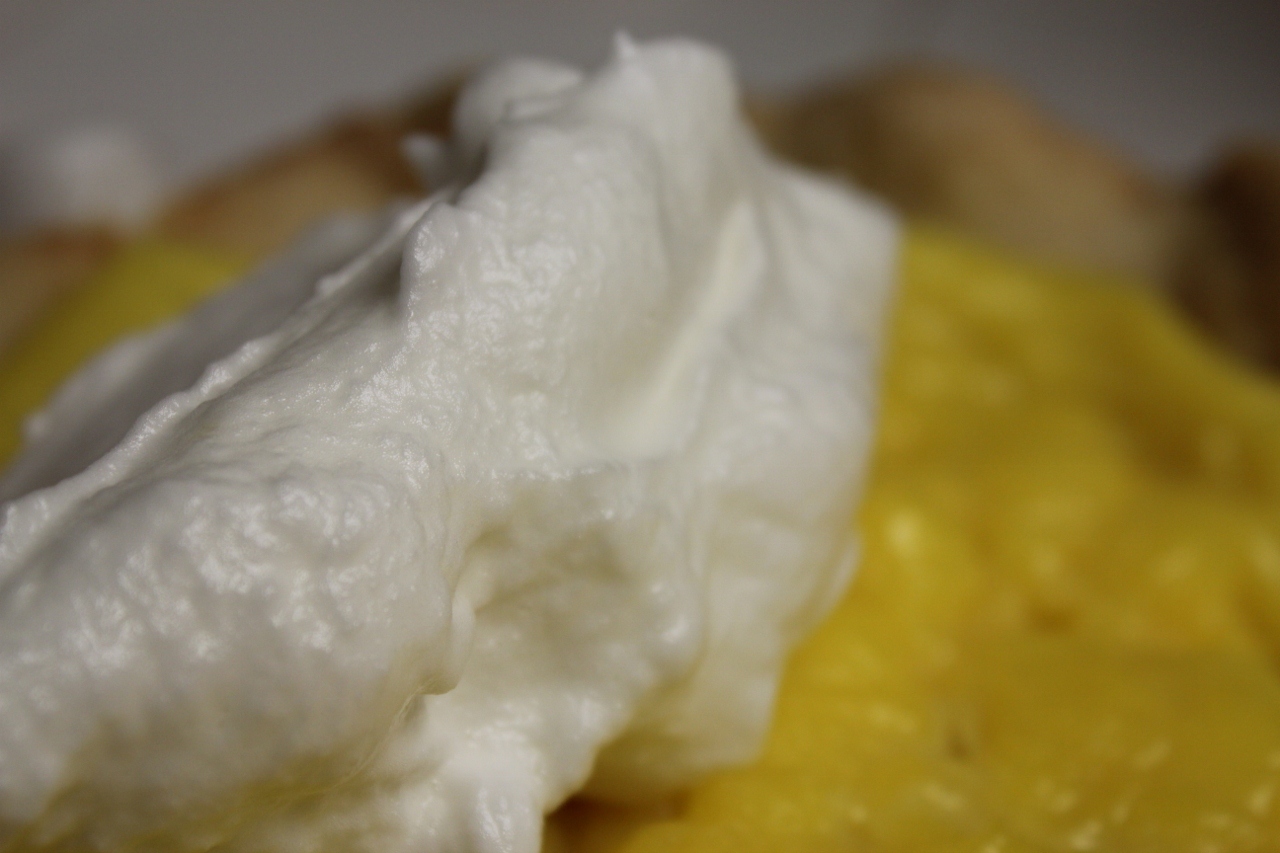
When the lemon filling is firm, make the meringue by combining the egg whites, sugar, and salt in a heat-proof bowl.  Set over a pan of simmering water and beat until warm and the sugar and salt are dissolved into the egg whites.
 
Remove bowl from heat and whip into stiff peaks.  This alone makes pre-stand mixer cooks who could make any kind of lemon meringue pie, much less a beautiful one, head and shoulders above all the rest of humanity.
 
Spread the meringue over the pie  so that it touches the crust all around.  This will, at least in theory, reduce the “weeping” that occurs (in which watery puddles form at the bottom of the pie pan after pieces are removed).  Using the flat part of a spatula, lightly tap all over the surface of the meringue to encourage well-intentioned, “it came out this way all on its own” peaks.
Broil until brown, approximately two minutes.  Watch as closely as you would a two-year-old in a china shop.
Serve at room temperature.
Notes
Because I was so intimidated by its height and its gravity (or lack thereof), I was very careful to adhere to Martha’s meringue work.  With that said, it didn’t quite taste right.  The lemon filling was delicious, and the crust was of course delightful, but the meringue was, as Nick put it, savory.  Not the expected sweet.  Don’t get me wrong, it didn’t keep me from finishing my slice.  Very quickly.

outrageous oatmeal cookies

EVERY COOK has go-to recipes for certain occasions.  Those tried-and-true recipes that are guaranteed, barring a gas leak, a broken stove, or an act of God, to impress.  The only downside for these recipes, of course, is that there are never any leftovers.

I’ve always tried to keep my go-tos to a minimum for fear of seeming a one-trick (or two-trick, or three-trick) pony.  In college, it was lime and garlic chicken fajitas — the simple, cheap meal that, in California at least, everybody eats.  These days, I have two go-to meals.  One for special occasions (maybe I’ll share it some time), and one for friend or work barbecues.

Outrageous oatmeal cookies are what I make when I’m going to a barbecue.  They’re perfect on so many levels.  First, they’re delicious.  Second, they’re unassuming.  Their appearance, and their very nature as a dessert, means that they won’t be upstaging the host’s dishes.  (At least, until they’re the first dish gone.  But then they’re gone.  At that point, you can’t be blamed for a nonexistent dish.)  And finally, they’re not a guilty cookie. Whole wheat flour, no butter (!)… sure, cookies are never foods on which you should subsist.  But if they’re delicious first, and not terribly bad for you second, it’s a bonus.  (Depending on your crowd, you lead with delicious or lead with “no butter, but delicious!”)

OUTRAGEOUS OATMEAL COOKIES, adapted slightly from my mother’s recipe drawer

Ingredients:
1 1/2 cups vegetable oil
2 eggs
2 cups whole wheat flour
2 teaspoons baking powder
1 teaspoon salt
2 cups packed brown sugar (light or dark)
6 cups old-fashioned oats (or part granola)
2 cups broken walnuts
6 ounces semi-sweet chocolate morsels
1/2 cup warm water

Directions:
Preheat oven to 375 degrees Fahrenheit with the rack in the center position or with both racks evenly distributed around the center of the oven.

Combine oil and egg, whisking briefly to combine.  Mix flour, baking powder, and salt in a very large mixing bowl, and stir until blended.

Add brown sugar, oats, walnuts, and chocolate, then stir to combine.  Add oil and egg mixture and work through the dough with a wooden spoon (or your fingers) until moistened throughout.  Add just enough warm water to make the mixture damp enough to hold together.

Generously grease two heavy baking sheets.  Using a 1/4 or 1/3 measuring cup (depending on desired size of cookies) to form the mixture into mounts and place on baking sheet with 1-3 inches between them.

Bake for 10-15 minutes until the cookie feels done when pressed with a finger.  Cool briefly, then use a spatula to remove from baking sheet.  Cool completely.

Notes:

The “very large mixing bowl” is no joke.  I don’t have a bowl big enough.  I use my fingers to mix the ingredients because using a spoon knocks too many of the ingredients out of the bowl and, invariably, onto the floor.  And, let’s face it, I use my fingers to mix because it’s also fun.